Nearly one in five UK property purchases uncovers a significant defect that the buyer did not anticipate before exchange, defects that can cost tens of thousands of pounds to fix. A building survey is the primary tool buyers have to avoid that outcome, yet most people commissioning one have little idea what actually happens during those two to four hours on site. Understanding what does a surveyor actually check in a building survey, and why certain findings matter more than others, transforms the report from an anxiety-inducing document into a genuinely useful guide.
This article walks through the full inspection sequence, room by room and element by element, so that buyers, sellers and property owners can approach the process with confidence.
Key Takeaways
- A building survey is a visual inspection only, surveyors do not lift floorboards, move furniture or test gas appliances, but they do use specialist tools such as moisture meters.
- The RICS Home Survey Standard sets three levels of inspection (Level 1, Level 2, Level 3), each with a defined scope; the higher the level, the more detailed the examination.
- Surveyors work systematically from the roof down, covering external elements first, then every internal room, then services and grounds.
- Condition ratings (C1, C2, C3) signal urgency: C3 items require immediate action and can be used to renegotiate the purchase price.
- The report is a snapshot of the property at the time of inspection, it cannot predict future defects or guarantee hidden elements.
The RICS Framework: Three Levels, One Standard
Before stepping onto a property, a surveyor works within a defined professional framework. The RICS Home Survey Standard, first published in November 2019 and effective from 1 March 2021, is the mandatory benchmark for all condition-based residential surveys carried out by RICS members and regulated firms across the UK [2][3]. As of 2026, RICS confirms this standard remains the core framework for home surveys [1].
The standard formalises three survey levels:
| Level | Common Name | Typical Use |
|---|---|---|
| Level 1 | Condition Report | New builds, modern properties in good condition |
| Level 2 | HomeBuyer Report | Conventional properties in reasonable condition |
| Level 3 | Building Survey | Older, larger or significantly altered properties |
RICS describes these as "basic, intermediate or advanced" inspections to help consumers understand the difference in depth [1]. At every level, the inspection is explicitly a visual examination, surveyors record what can be seen without moving heavy furniture, lifting fitted floor coverings or carrying out invasive opening-up works [2][4].
For buyers of older London properties, a Building Survey in London at Level 3 is almost always the appropriate choice. If cost is a concern, reviewing how much a structural survey costs in 2026 before instructing a surveyor helps set realistic expectations.
Starting at the Top: The Roof and External Inspection
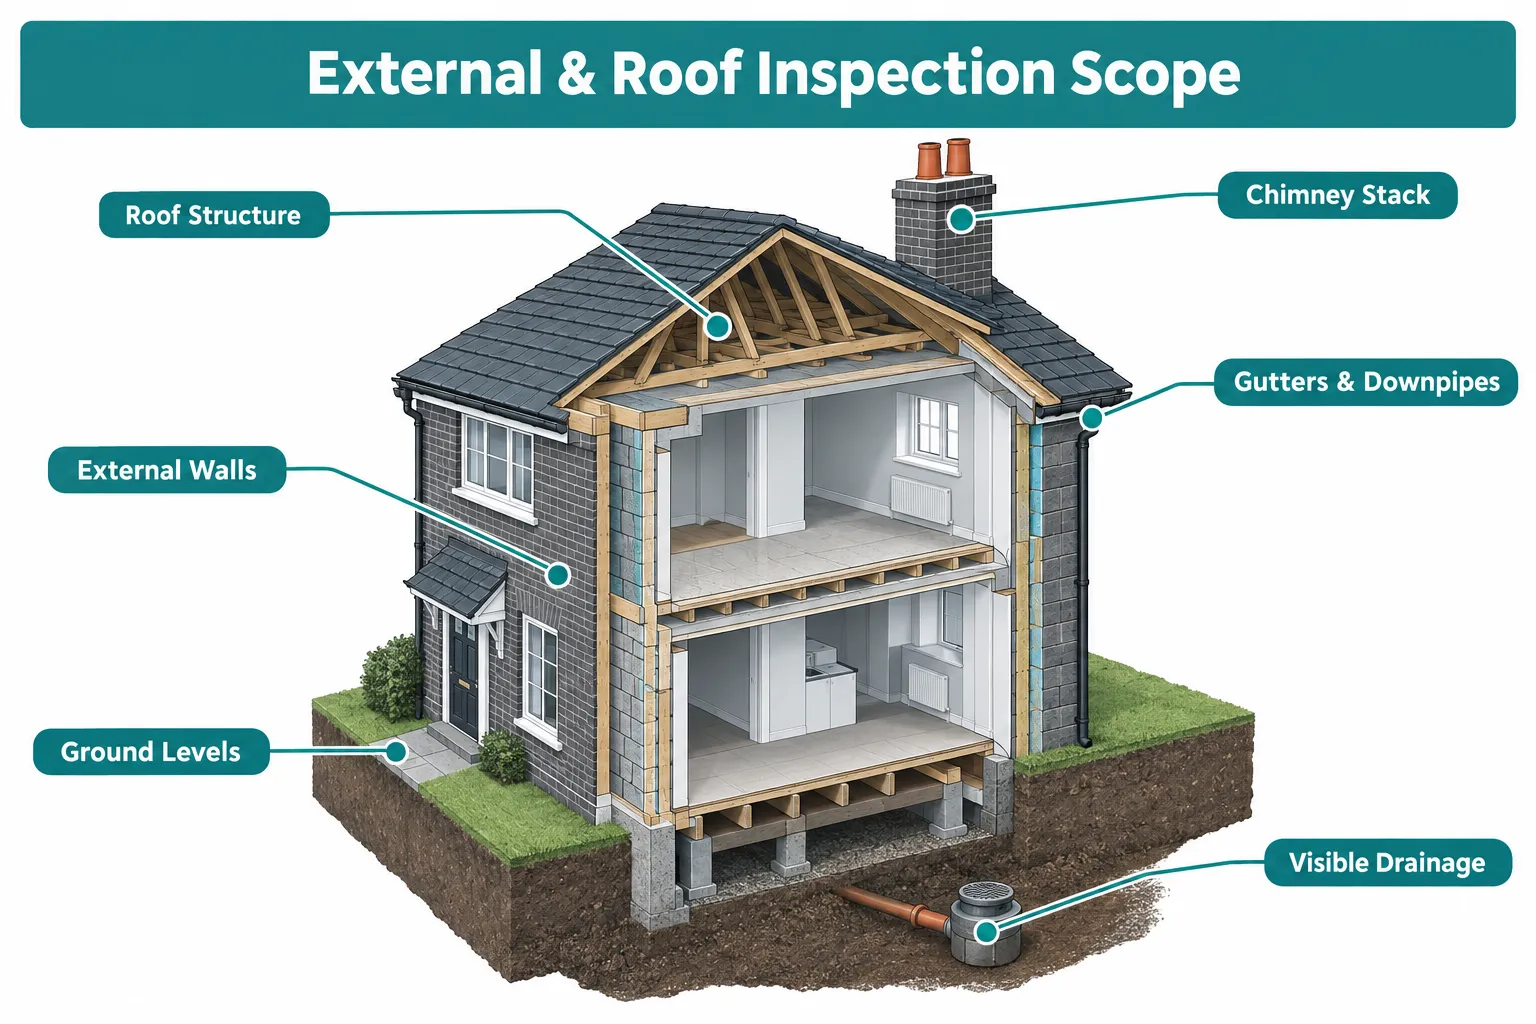
Every competent surveyor begins outside, and almost always starts at the highest point, the roof. This is deliberate. Water ingress from a failing roof can cascade through every floor of a building, making roof condition one of the most consequential findings in any survey.
Roof Covering and Structure
The surveyor examines the roof covering from ground level using binoculars, and from within the roof space where safe access is available. Roof spaces below approximately three metres may be entered by ladder for a visual inspection of the structure, insulation and ventilation [10]. Key items assessed include:
- Slates and tiles: Missing, slipped, cracked or moss-covered units that allow water penetration
- Ridge and hip tiles: Condition of mortar bedding and pointing
- Flat roof sections: Blistering, cracking, ponding water or failed upstands
- Roof structure: Rafter condition, signs of sagging, spread or previous repair in the roof space
- Insulation and ventilation: Depth of insulation, presence of cold bridging, adequacy of eaves ventilation
For properties where roof access is restricted or the pitch is steep, a drone roof survey in London can supplement the visual inspection with high-resolution imagery.
Chimneys, Gutters and Downpipes
Chimneys are inspected for pointing condition, flaunching (the mortar cap around pots), pot condition and whether flues appear properly capped or ventilated [6][12]. Failed pointing on a chimney stack is one of the most common sources of penetrating damp in UK properties.
Gutters and downpipes are checked for:
- Blockages, sagging sections and missed joints
- Staining on external walls directly below, a strong indicator of long-term overflow
- Cast iron components showing significant corrosion
External Walls, Windows and Doors
The surveyor works methodically around the entire perimeter of the building. External wall checks cover:
- Cracking patterns: Diagonal cracks at corners, stair-step cracks in brickwork and horizontal cracks can each indicate different structural issues, from settlement to lintel failure to subsidence [9]
- Pointing and mortar: Eroded or missing mortar allows moisture into the wall construction
- Render: Hollow-sounding sections (tapped with knuckle), cracking or bulging indicate failure of the render coat
- Wall ties: In cavity wall construction, signs of tie failure include horizontal cracking at regular vertical intervals
- DPC (damp-proof course): Whether a visible DPC is present, bridged by raised ground levels or render
Windows and external doors are assessed for frame condition, seal integrity, evidence of rot in timber frames and whether double-glazed units have failed (visible condensation between panes).
"Surveyors ignore décor and contents entirely. Their focus is on defects, safety issues and risk indicators, damp, movement and inadequate ventilation, in every element they examine." [6][12]
Ground levels around the property are also noted. Where soil, paving or render has been raised above the DPC, the risk of rising damp increases significantly. For a detailed look at how ground movement manifests, the guide on what subsidence looks like and how it is fixed provides a useful companion reference.
Inside the Property: A Room-by-Room Inspection Guide
Once the external examination is complete, the surveyor moves inside. The internal inspection follows a systematic pattern, typically top floor to ground floor, covering walls, ceilings, floors, windows and any fixed elements in each accessible room [6][12].
Living Rooms and Bedrooms
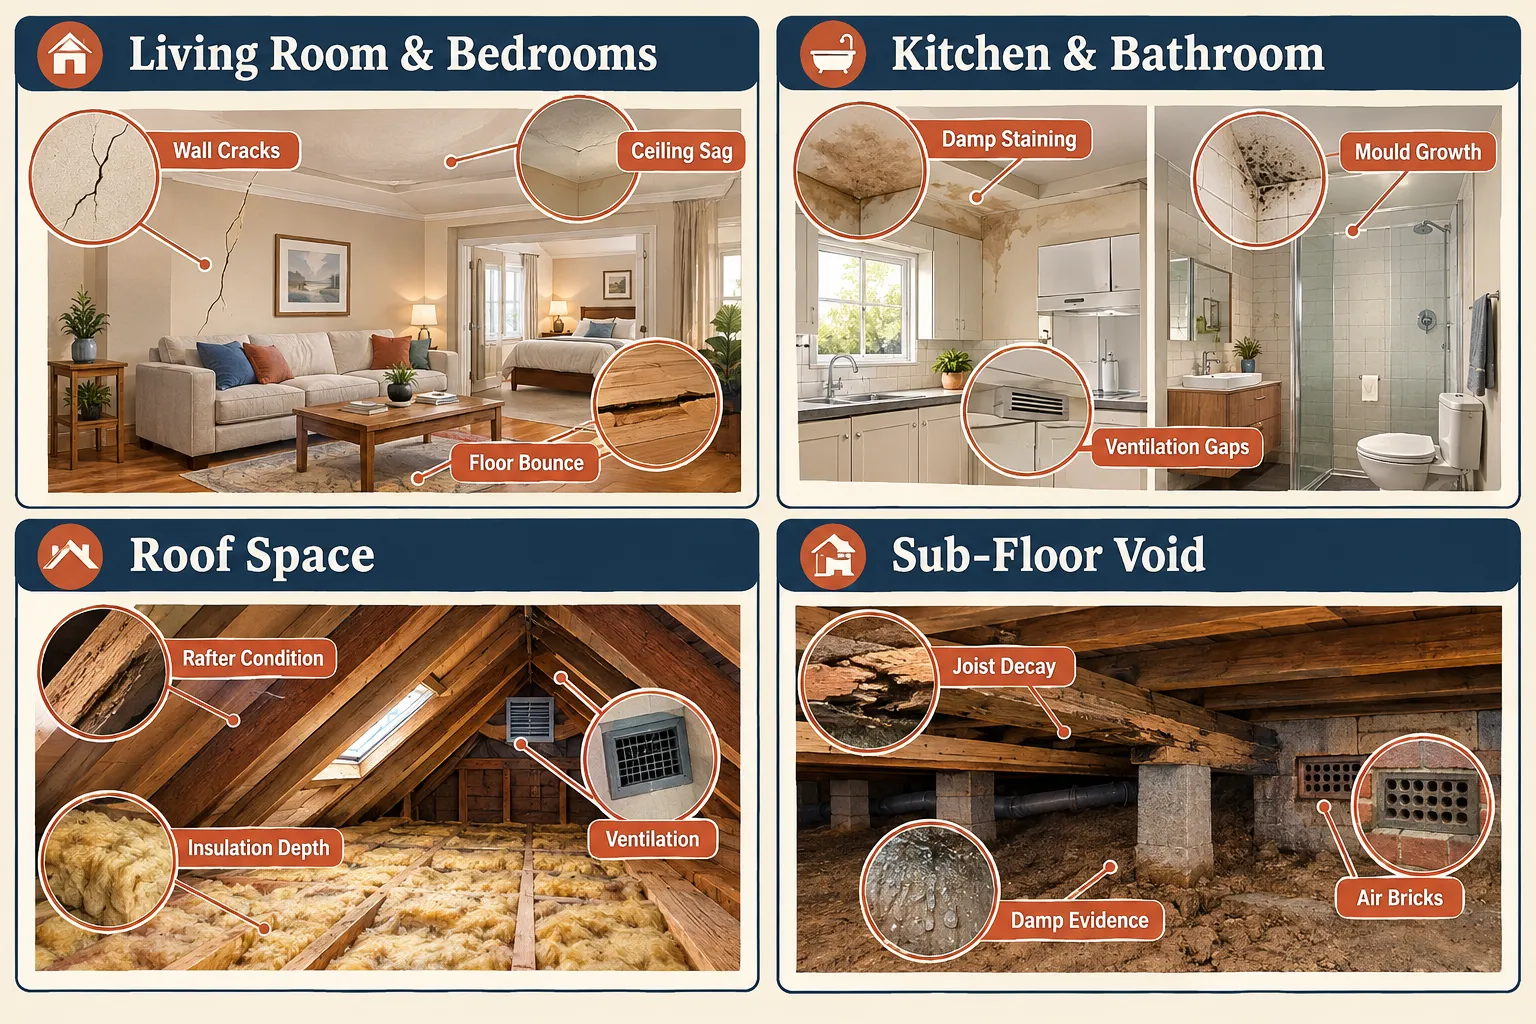
These rooms are assessed primarily for structural integrity and moisture. Surveyors are not interested in paint colour or carpet condition. They look for:
Walls and ceilings:
- Cracks, size, pattern and whether they appear active or historic
- Bulging or detached plaster
- Damp patches, tide marks or staining that suggest penetrating or rising damp
- Evidence of previous repairs that may mask underlying movement
Floors:
- Sloping, unevenness or springiness underfoot
- Soft spots that suggest joist decay or beetle infestation beneath
- A simple "heel drop" test on accessible floor areas can reveal excessive deflection in suspended timber floors [10][13]
Fireplaces and chimney breasts:
- Hearth condition and structural integrity of the breast
- Whether the flue is capped, ventilated or in use
- Staining or damp around the chimney breast, which often indicates a blocked or poorly ventilated flue
Windows:
- Operation, frame condition and seal integrity
- Trickle vents, their presence or absence affects ventilation assessment
Kitchens, Bathrooms and Wet Rooms
Moisture-prone rooms receive particularly close attention. The surveyor uses a calibrated moisture meter to take readings at wall bases, around pipework penetrations and in areas where damp is visually suspected [6]. Checks include:
- Damp staining, blistering paint and salt crystallisation (efflorescence) on walls, indicators of rising or penetrating damp
- Mould growth, especially in corners, on external walls and around window reveals, often linked to condensation from poor ventilation
- Ventilation provision: Trickle vents, mechanical extractor fans and window openings are noted; inadequate ventilation is a primary cause of mould and condensation complaints [6][12]
- Visible pipework: Condition, evidence of past leaks (staining beneath sinks and basins), and whether any pipework appears to be lead
- Silicone seals and tile grout around baths, showers and splashbacks, failed seals allow water into wall and floor structures
Roof Space
Where the roof space is safely accessible, the surveyor enters by ladder. The internal roof inspection covers [10]:
- Rafter and purlin condition, looking for splits, deflection or previous repairs
- Signs of water ingress, staining on timbers, daylight visible through the covering
- Insulation depth and coverage
- Ventilation, blocked eaves or absent ventilation increase the risk of condensation rot in roof timbers
- Any signs of previous or active infestation (woodworm frass, evidence of rodents)
Sub-Floor Void
For properties with suspended timber ground floors, surveyors may use an "inverted head-and-shoulders" inspection through accessible sub-floor openings to check for [10]:
- Adequacy of sub-floor ventilation through air bricks
- Evidence of dampness or standing water
- Condition of floor joists, including signs of wet rot, dry rot or beetle damage
- Whether air bricks are blocked by raised external ground levels or garden debris
Blocked air bricks are a very common finding in older UK properties and can lead to significant timber decay if left unaddressed.
Services, Grounds and Final Checks
Services: Visual Assessment Only
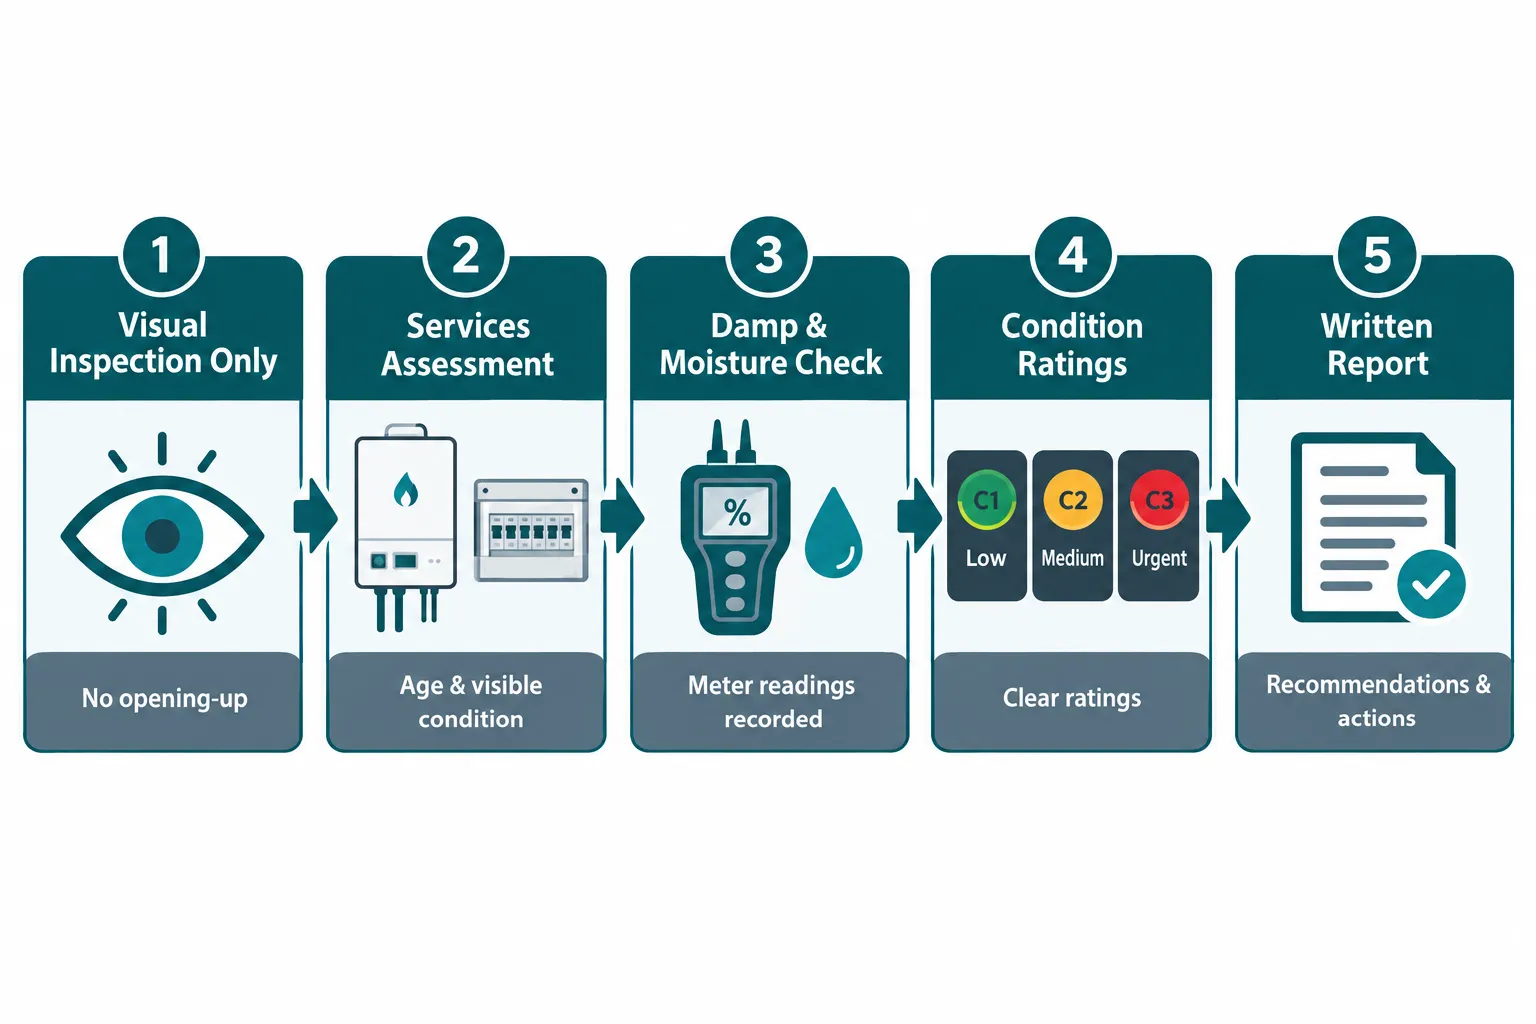
One of the most important things to understand about a building survey is what it does not include. Surveyors assess services, electricity, gas, heating, plumbing and drainage, on a visual basis only [2][9]. They do not test wiring, operate gas appliances or pressurise internal pipework.
What the surveyor does record:
- Electrical installation: Age and apparent type of consumer unit, visible wiring condition, whether an EICR (Electrical Installation Condition Report) is recommended
- Heating system: Age and apparent condition of the boiler, visible pipework and radiators, whether a Gas Safe engineer's inspection is recommended
- Plumbing: Visible pipework materials (copper, plastic, lead), evidence of past leaks, condition of visible drainage connections
- Drainage: Inspection chamber covers lifted where accessible; evidence of blockages or root ingress
Reports will typically recommend further specialist testing for services where concerns are identified [9][11].
Grounds and Outbuildings
The site inspection covers paths, drives, steps, retaining walls and boundary structures for condition and safety [5][10]. Permanent outbuildings such as garages and stores are inspected at Level 2 and Level 3 surveys. For flats, communal areas and access routes are also assessed where reasonably accessible [10].
Key concerns in the grounds include:
- Retaining walls showing movement or bulging
- Steps and paths with significant trip hazards
- Boundary walls in poor condition that may require costly rebuilding
- Evidence of Japanese knotweed or other invasive species
For properties where boundary ownership is unclear, a boundary survey in London may be warranted alongside the building survey.
Condition Ratings Explained
At the end of the inspection, every significant element is assigned a condition rating:
- C1 (Green): No repair is currently needed
- C2 (Amber): Defects that need repairing or replacing but are not considered serious or urgent
- C3 (Red): Defects that are serious and/or need to be repaired, replaced or investigated urgently
C3 ratings are the items that buyers should focus on immediately. They represent the findings most likely to affect the purchase price, mortgage offer or the decision to proceed. For buyers who want to understand the full scope of what to look for before commissioning a survey, the checklist for house surveys in London provides a practical pre-survey reference.
It is also worth noting that if a property is a new build, a survey is still strongly advisable, the guide on whether you need a survey on a new build explains why defects are common even in recently completed homes.
What a Surveyor Cannot Tell You
Understanding the limits of the inspection is as important as understanding its scope. A building survey will not reveal:
- Hidden defects behind finished surfaces, unless there is visible evidence suggesting a problem
- The condition of concealed drainage runs, a CCTV drain survey is a separate instruction
- Whether planning permissions were obtained for alterations, that requires a legal search
- The precise cause of a crack, the surveyor will note it and recommend further investigation where warranted
- Future deterioration, the report is a snapshot of the property on the day of inspection [2][4]
For properties where structural alterations have been made, extensions, loft conversions, removed walls, the surveyor may flag the need for a structural engineer's opinion. A residential structural engineer in London can provide the specialist analysis that sits beyond the visual scope of a standard building survey.
Conclusion
A building survey is not a pass-or-fail test for a property. It is a detailed, professional record of condition that equips buyers with the information they need to negotiate, plan repairs and budget accurately. The inspection follows a rigorous sequence, roof and externals first, then every internal room systematically, then services and grounds, guided by the RICS Home Survey Standard that has governed UK residential surveys since 2021 [2][3].
Actionable next steps for buyers in 2026:
- Match the survey level to the property. Level 3 is appropriate for any property built before 1960, significantly altered, or showing visible signs of defects.
- Read the C3 items first. These are the findings that require immediate action and carry the most weight in price negotiations.
- Commission specialist reports where recommended. Gas Safe, EICR, CCTV drain surveys and structural engineer reports are separate instructions, do not assume the building survey covers them.
- Use the report before exchange, not after. The survey is most valuable when there is still time to renegotiate or withdraw.
- Ask the surveyor questions. RICS members are required to be available to discuss their findings, a phone call after receiving the report can clarify the most critical items.
References
[1] Home Survey Standards – rics.org
[2] Home Survey Standard Nov 2020 – rics.org
[3] Home Surveys – rics.org
[4] studocu – studocu.com
[5] Building Surveying Standards – rics.org
[6] Level 2 Survey Checklist What Surveyors Check – lmsurveyors.co.uk
[9] Scope Of Inspection Home Survey Level Two – rics.org
[10] Home Survey Standard – designingbuildings.co.uk